|
"−surflight_dump" command line option for light.exe saves all of the generated lights to a file "mapname-surflights.map", so you can then paste the copies into your map and edit them individually.
http://imgur.com/a/p6jZt
From this screenshot you can see how i light my maps, hundreds or thousands of low emission lights that i tweek after i have vised my map, i move them change the values, and its difficult. How do the Pro's create lighting in maps? compile often. take your time and compare diff setups.
in the end you will get a feel for it. I am not a pro but try this out:
Place a point light near a light source texture with: light: 400 wait: 3 After that, test your map and you should notice that the light sources appear to be the source of light. Now add some fill lighting around dark sections of your map (Darkness and shadows are important so don't go crazy!) Light: 100 - 200 Delay: 5 *Keep in mind these are just numbers, you'd have to adjust and play around to get to where you want to be* That should give you a good start. There are many different advanced techniques and better ways to do things depending on the situation but try that out! Like MFX said, you'll just get a feel for it after testing things. Enlightning Techniques for the masses.
I found this Sock mail i think it is helpful for you: * Never place symmetrical light sources in a room * Never use global ambient light, learn to light maps properly * Place strong light source first before placing additive fill lights * If a room lacks strong shadows, tone down fill lights * Consider shadow area contrast when placing source lights * Understand the advanced features of wait/delay * Try to keep light/wait values consistent for light source types * Always sync light entities to actual light sources * Always Illuminate the primary path * Light Flicker (style 1) can be useful for focus in a room * Play with up lights for ceiling detail focus * Lights can use mangle/angle parameters for directional spotlights * Lights should always create interesting shadows * Place strong lights for large shadows, fill lights to soften the edges * Switchable lights are perfect for creating dynamic detail * Place identical light sources at the top and bottom of platforms so that when the platform is in both positions it looks right for the light source Got it? Good. I gather they have something to do with how far the light reaches and its intensity at the source, but I need to learn how they work.
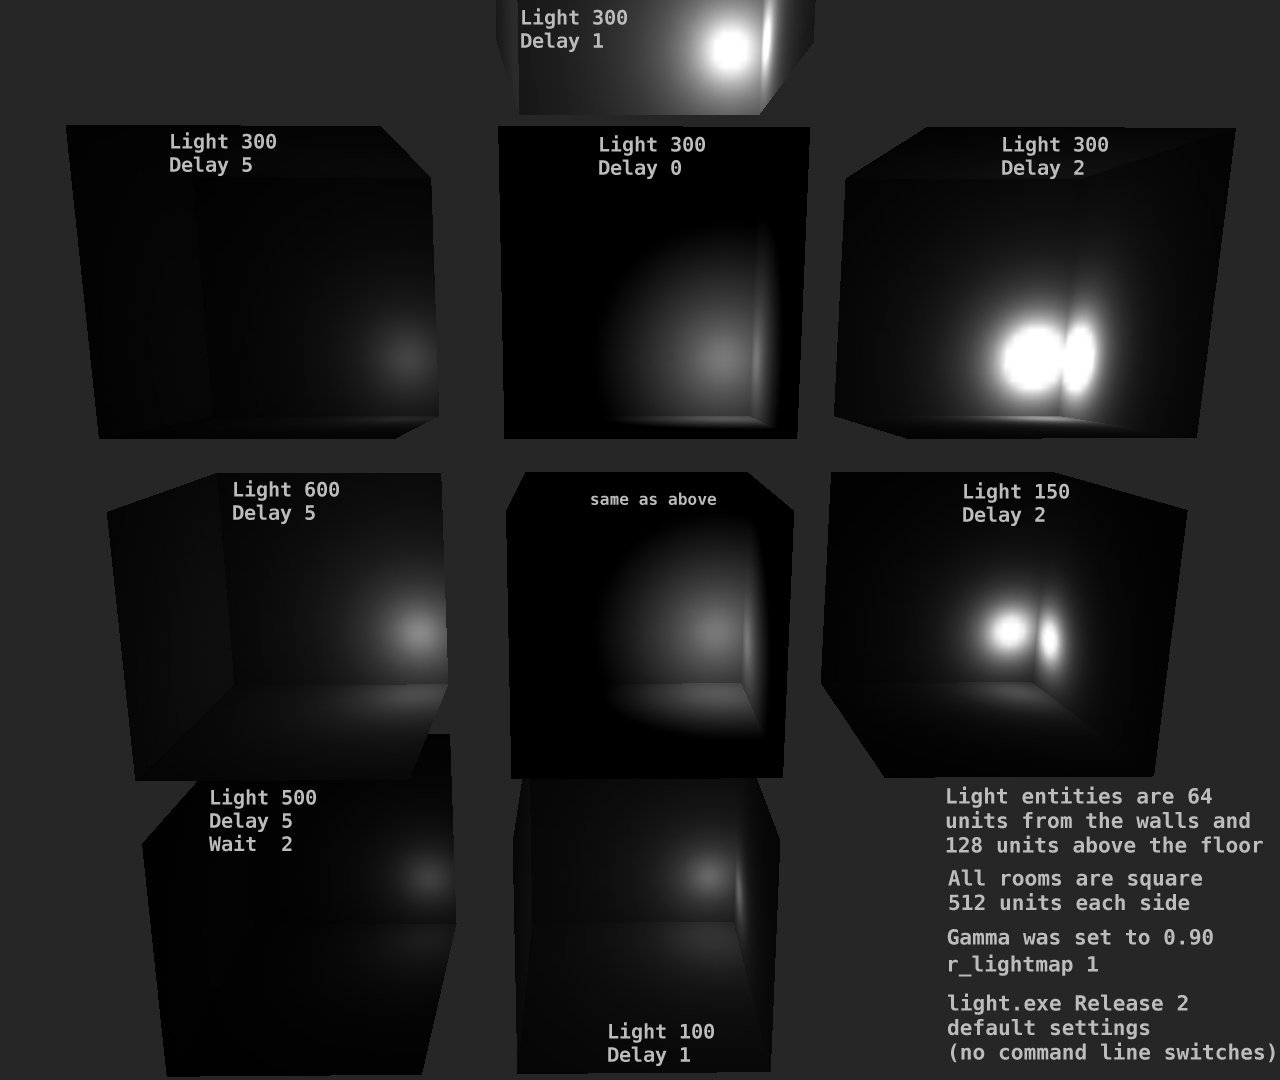
Yes, I already had this pic, but it's not as clear regarding which param does what as Skacky's link. Plus, it doesn't showcase all scenarios. It's still a good immediate reference, though.
If there is a way to edit the first post in a thread, this kind of useful stuff should be "stickied" in the mapping help OP.
Yes, it could be better, but the top two rows were all I actually made it for.
Notice how the appearance changes with light constant and only delay changed. Then below that the delay is the same but light value is changed. It allowed me to see what those parameters did. I would actually urge mappers to build a similar map for themselves. Some things are more easily seen if viewed in game, such as just how ridiculously far one light can extend using delay 1. this is good stuff, i've been playing around with the "wait" value and it makes things alot simpler, i no longer place a million lights.
That light test game screenshot, is it using white textures? I want to create own and test different sized room etc.
About this fill lighting, it is not intended to come from "real" light sources (like lamps, flares, fire etc.) But doesn't it look weird if there is bright random ball shaped lights in every corner. How do you blend fill lights professional? Don't know is it possible to give certain areas minlights (well func_wall, maybe it is possible to give the other funcs too). Then again, what is good minlight value even, 25,50,75,100? Seems like this requires a lot or trying. But doesn't it look weird if there is bright random ball shaped lights in every corner.
That's not what "fill lights" are. Fill lights are low brightness and designed to lighten shadows, simulating ambient or bounce light. Before ericw implemented procedural bounce, they were used liberally. So it seems like answer is.. never use fill lights if possible? Never use minlight if possible. Minlight is ugly and flat. Fill lights are good. Although now with the bounce functionality, they might not need to be used so much, I haven't really tested the new bounce stuff out though.
|
| You must be logged in to post in this thread. |
| Website copyright © 2002-2025 John Fitzgibbons. All posts are copyright their respective authors. |