|
You can also use the face editing mode in Jackhammer to align one face to the edge of another. It compensates for skewing and angles and all that jazz so it looks crisp and perfect.
or you could just reduce horizontal scaling.
on 45 degree angles, I usually reduce to 0.75 which seems to look right. There's probably a mathy way to get the exact number, but I just tend to wing stuff like that. The correct value can be computed using pythagoras' theorem - on a 1:1 ratio triangle 1� + 1� = 2, so the 45 degree side is longer by a factor of sqrt(2).
1/sqrt(2) = 0.707... That gives you more accurate matching of pixel density, but 0.75 is probably preferable as it will tile better: 3 texture widths on the orthogonal axes will make exactly 4 on the diagonal. One more worked example: on a 1:2 slope we get 1� + 2� = 5, so the side is sqrt(5) times longer than the shortest side. However, we need to find the ratio of the longer side to this value, because orthogonal projection starts on the longest side. 2/sqrt(5) = 0.894 0.875 is an interesting choice of approximation here, 7 tiling-widths of the texture on the long axis would give exactly 8 repetitions on the slope. Also 0.9 is an option, where 9 tiling-widths gets you 10 repetitions, and standard texture scale isn't a bad approximation either.. Thanks for the maths Preach! I just wing it but that takes so much time.
So used to radiant now, WC editors seem so clunky in comparison. yeah, ~0.71 is correct but 0.75 is what i use because if you do a standard 12-sided cylinder, the straight sides are 4:0 and the angled sides are 3:1, that "3" means a 0.75 scale will fit perfectly.
Use the 'fit' tool in Radiant. I've only recently started using it (with my Q3 map), and I've learned to really love it.
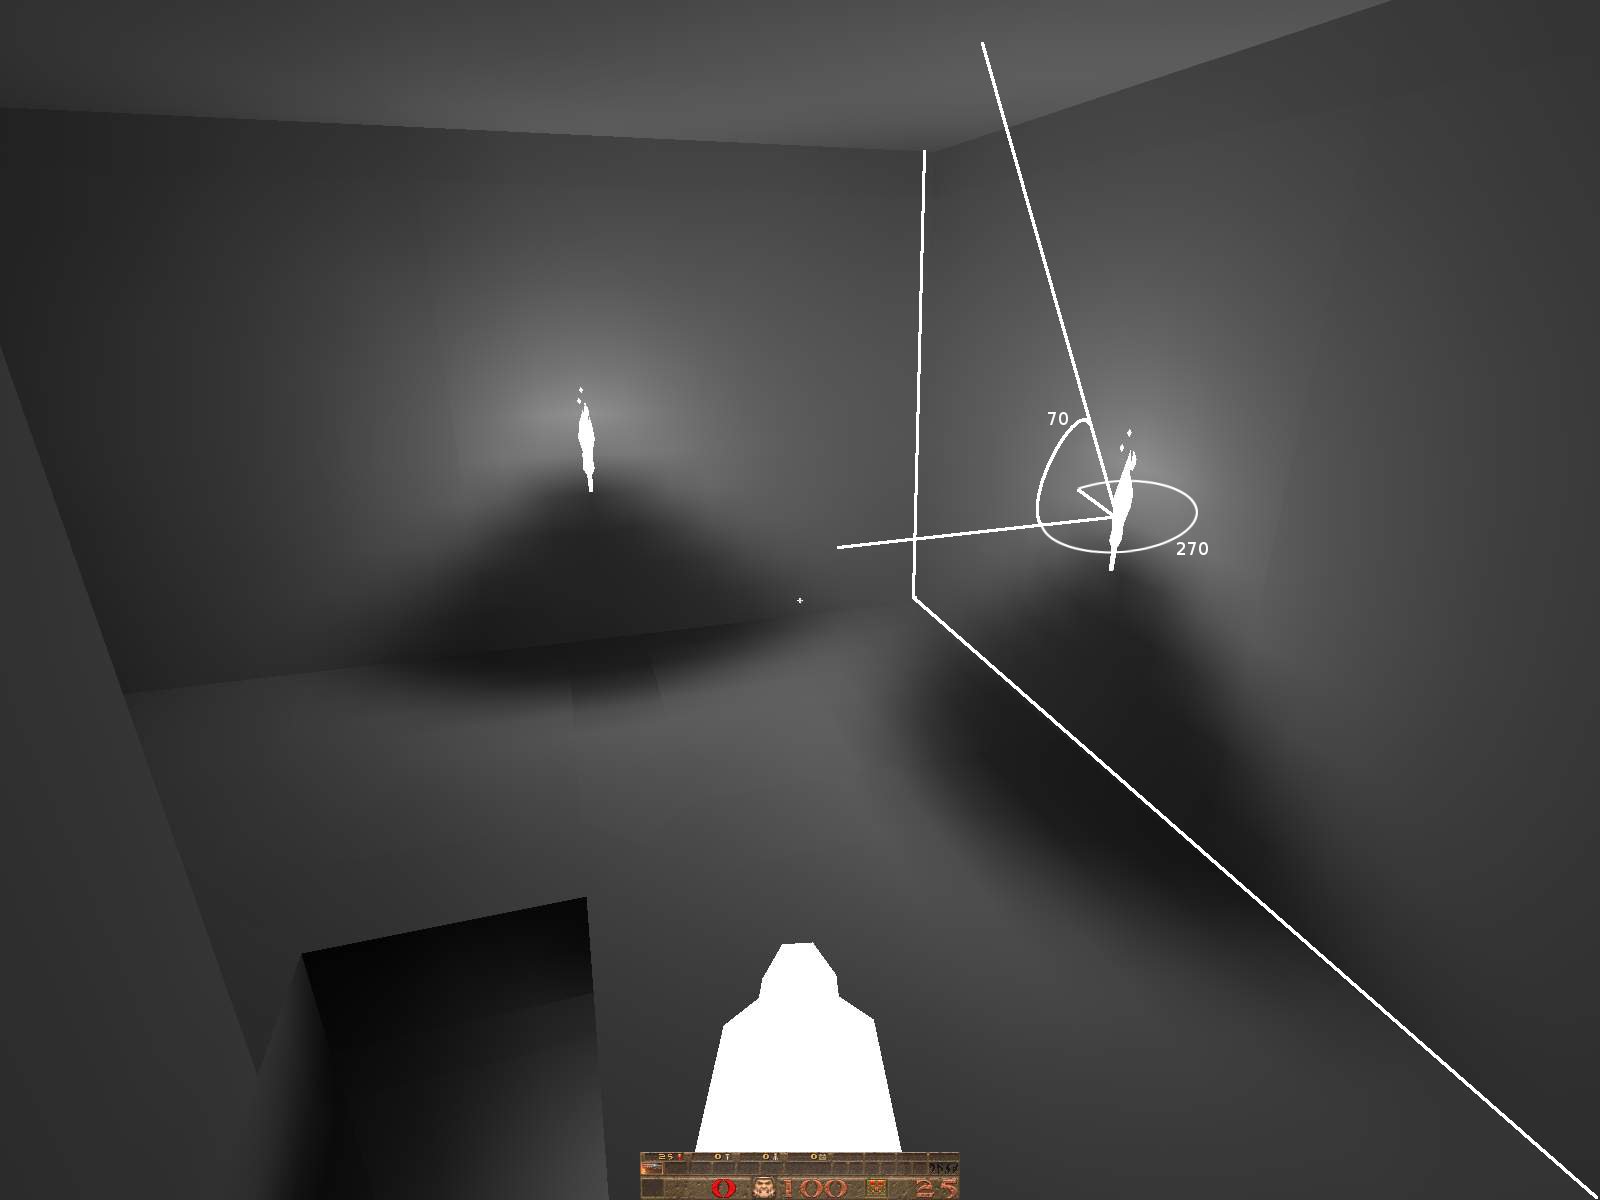
Takes a little getting used to, and you still have to input the correct rotation (Arctangent of Rise/Run, ATAN(-1/2) = -26.5... here), but it takes care of the scaling for you! http://scampie.net/etc/angledtexture.png Took me 30 seconds to make and align the texture with the fit tool. I do wish that TB was easier to align textures for. Even in TB2 it's fiddly. Should have the ability to align all sides, say how many times the texture should tile/repeat etc.
okay, i was a bit confused, let me clarify
1. a standard 12-sided cylinder would have straight sides of 4:0 and angled sides of 4:2, so you don't need any scaling for it to look good. 2. the standard 24-sided cylinder has sides of 4:0, 4:1, 4:2, 3:3. I generally only bother adjusting scale with the 3:3 one and i would use 0.75 scale. In both the above cases, the goal is not mathematical correctness but a) avoiding obvious stretching and b) getting "panel" type textures to perfectly fit the face. Because of the orthographic projection, the 4:0, 4:1, and 4:2 sides all get the same projected width. For 45-degree angled faces not part of a cylinder (and with flat "material" textures), 0.71 or 0.70 is what i generally use. I've tried this before a hundred times and never got anywhere.
Time to try again! What's the most generally user-friendly editor for Q1SP maps? I need something any lobotomized sack of protoplasm could pick up and use to spit out a hideous piece of barely playable garbage. A good Q1 mapping primer would also not go amiss here, if anyone has a link to one -- not a tutorial, just a breakdown of stuff you're going to need to get really familiar with and various shortcuts. I made a tutorial video which starts from literally the beginning (downloading the files) all the way up to making your first box map.
https://www.youtube.com/watch?v=BisleGBgQ4w It's unlisted because it's not really well done. I intend on re-formatting and making a decent video at some point. I haven't watched it yet, but thanks for making that tutorial, Fifth!
I'm a complete newbie mapper, and decided to go the TrenchBroom route. Can't say how it compares to other editors, as it's the only one I have ever tried, but it is reasonably user friendly (I cannot wait for TB2 and 2D views, though, as I find the perma-3D thing a little frustrating at times). Need to plug Scampie's TB tut here too: http://quakewiki.org/wiki/Getting_Started_Mapping. Also look at this set of links: http://quakewiki.org/wiki/Mapping_tutorials. This list of Quake entities http://web.archive.org/web/20090506031258/http://hosted.planetquake.gamespy.com/worldcraft/index2.shtm is particularly useful. It is not 100% complete, but incredibly helpful nonetheless. Daz's TB video https://www.youtube.com/watch?v=Wr9FR1W1JFE also gives one a very good sense of what's where. If you're on Linux, this guide http://andyp123.blogspot.de/2013/03/running-trenchbroom-quake-editor-on.html is extremely helpful in installing TB. and Trenchbroom. I actually managed to make a box map, which i was previously unable to do! (Yes, seriously.)
However, Trenchbroom seems limited to box maps (maps with right corners, at least) with an initial glance and I want to use my architectural studies to the fullest. The tutorial links are nice, but I learn very poorly from tutorials (more specifically, I learn to make EXACTLY what they teach very well, which is great for general purpose elements but bad for complex stuff). The stuff on QuakeWiki could be useful, but I can't tell as it won't load at all! What I really need is a bunch of "tips-n-tricks" along with basic function reminders. Things like the tutorial on pipes shortly above my post are a great example of stuff I can actually learn well from, even though it doesn't look like I could apply it easily to Trenchbroom. Combined with a reference guide (not docs so much as a cheatsheet) for the editor I could get on my feet very quickly. However, Trenchbroom seems limited to box maps (maps with right corners, at least) with an initial glance and I want to use my architectural studies to the fullest.
Press v. However, Trenchbroom seems limited to box maps (maps with right corners, at least) with an initial glance and I want to use my architectural studies to the fullest.
Much to learn, young Padawan...much to learn... http://kristianduske.com/trenchbroom/docs/
All you need is pretty much there. It's fairly simple and straightforward, gives you all the shortcuts you need. In terms of geometry creation, it's simple to use and understand but you can create complex stuff quite quickly. It's also very good for making organic geometry like rockwork and natural landscapes. Did you miss the documentation that TB comes with?
It's also available from here: http://kristianduske.com/trenchbroom/docs/ I normally don't check docs (especially "good" ones!) because they're generally full of overly technical info useless to a novice. Almost no consideration given to using them as a reference as you work.
Trenchbroom is a breath of fresh air all around! I'm building a nice little start-room for my first map right now. Thanks for the help guys! Couple remaining questions. How complex can the lighting get? For example, if I wanted the lightmap to be casting shadows of bars or (using those pyramidal post lights from the ID base maps) just be a thin slot pouring out horizontally, could I do that? What about spotlights? How would I go about doing these? Is there any way to visualize the lighting other than compiling the map and running it? Thanks again by the way, guys! unfortunately, there isn't much in the way of visualizing lights. as a beginner, you will just have to compile and check until you start to get a feel for the numbers.
you can check this out for a little more explanation of the settings you can give to lights: http://shoresofnis.com/post.php?postID=2 i would recommend you have little test rooms where you copy and paste the bits of the map you want to test out lighting on. once you have a good result, copy and paste that light entity. not only is it easier, but you'll get a more consistent look. this might help visualize spotlights a bit: http://shoresofnis.com/img/fakeshadows/torchShadows3.jpg if you have a really hard time, you can use target->targetname from lights to info_nulls. that way you always know where the spot is pointing. the guide touches on spot lights a bit. It can do more :)
http://www.quaketastic.com/files/screen_shots/rift0wip.PNG But, I'd recommend not trying doing such freeform stuff just yet - you'll (probably) get frustrated quickly since there are a lot of things you need to know about how BSP and the compilers work before you start pushing the limits. I've got some general hints, since I can't be bothered just now referencing stuff (and what everyone's provided above is more than enough for you to get started with). 1. Set yourself deadlines - the hardest part of mapping is finishing 2. It doesn't have to be perfect; concentrate on what you know is weak, not everything 3. Learn to be critical, identify where and why something is wrong 4. You don't have to release your first map 5. Personally, I don't follow any of these, and you'll develop your own method as you learn :D One I do follow though: 6. The journey is more important than the destination Good luck!
|
| You must be logged in to post in this thread. |
| Website copyright © 2002-2025 John Fitzgibbons. All posts are copyright their respective authors. |